Graphene Ceramic Coating™ Advanced
Adam's PolishesAdam's Polishes
3.0

Graphene Ceramic Coating™ Advanced

USD 132.99

Description

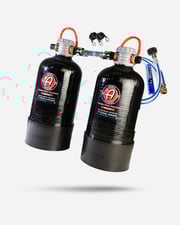
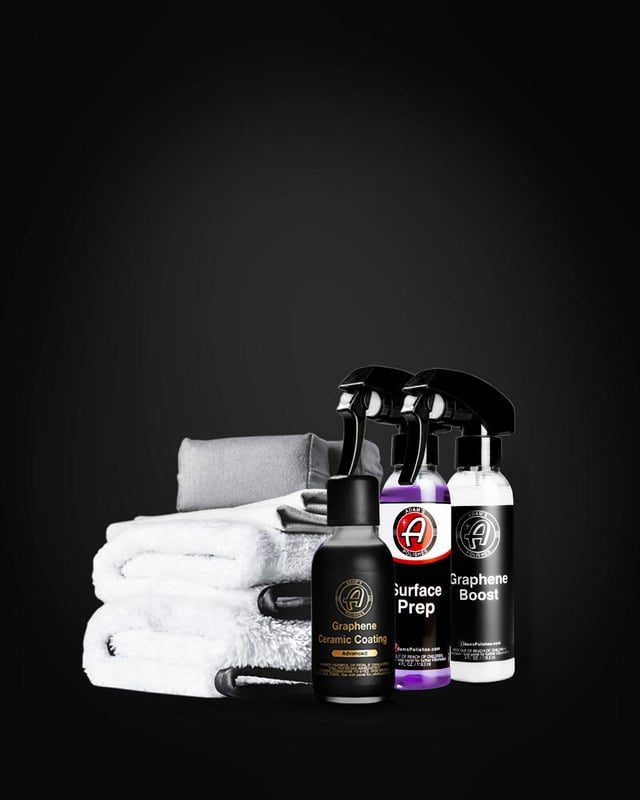
Adam’s Graphene Ceramic Coating™ Advanced is an easy-to-use Ceramic Coating that can be seen where applied using the Adam’s UV Flashlight and our patent-pending UV Tracer Technology™. With improved characteristics, this coating is appropriate to add long-lasting, extreme self-cleaning effects for single-stage and clear-coated, painted surfaces, glass, plastic trim, polycarbonate, rubber moulding, and wheels with a single bottle. >10H Hardness, 9+ Years of Protection 50% Increased Coating Resin Over Graphene Ceramic Coating™ Inclusion of Additional Silicate Resin for Added Durability and Longevity Less prone to water spotting Higher stain resistance against bugs, saps, droppings, etc. Higher scratch resistance during the washing process Increased depth and clarity to all surfaces Lower sliding angle with water evacuating at angles less than 10-15° Higher contact angles averaging more than 110-118° Patent Pending, UV Tracing Technology™ Free to apply to all Painted Surfaces, Glass, Headlights, Chrome, Trim, Wheels, and even Bed Liners! In the kit you’ll find:  1- 60ml Graphene Ceramic Coating Advanced 1- 4oz Graphene Boost 1- 4oz Surface Prep 2- Single Soft Towels 2- Suede Removal Towels 2- Suede Applicators 1- Pair of Gloves Optional 1- UV Flashlight Instructions for Paint & Glass: Prepare your painted surface or glass by using the supplied 4oz bottle of Adam’s Surface Prep and Surface Prep towel to clean and degrease the surface of any existing protection or residual films. For optimal results, users must Wash, Clay/Decontaminate, and Polish their paint prior to application. Shake coating bottle before use. Open the coating bottle and begin by dispensing numerous drops of the liquid onto the supplied Micro Silk applicator to sufficiently wet it. Work the product into the surface, ensuring full coverage over the desired area, using cross hatching motions and overlapping your previous pass by 25-50%. During your time between passes, utilize Adam’s UV Flashlight for inspections. Take note of between the body lines, bumper areas, mirror caps, and commonly missed areas on your vehicle. To ensure a thorough application, the light should shine and reveal an even and consistent bluish hue of light. If you notice streaking in the surfaces, level out with additional product and the used Micro Silk applicator.  Once the recently applied product begins to characteristically flash and sweat into beads, begin wiping the coating off, applying minimal pressure to the towel in the process. Wipe down in a similar cross hatch pattern as applied, switching/flipping the towel periodically to use a new face to fully level the coating. Once fully leveled, allow the coating to fully cure for 24 hours, free from water, elements, or weathering. Instructions for Plastic Trim & Headlights: Prepare your plastic trim or headlights by using the supplied 4oz bottle of Adam’s Surface Prep and edgeless utility towel to clean and degrease the surface of any existing protection or residual films. For heavily contaminated plastic trim or headlights, we recommend a deep cleanse with Tire & Rubber Cleaner and an edgeless utility towel. Open the coating bottle and begin by dispensing numerous drops of the liquid onto the supplied Micro Silk applicator to sufficiently wet it. Work the product into the surface, ensuring full coverage over the desired area, using cross hatching motions and overlapping your previous pass by 25-50%. Since the product is being applied to a porous surface, you will not see a rainbow/ flashing effect - the immediate color change of the plastic or trim will reveal where the product has been applied. However, you are also able to utilize the Adam’s UV Flashlight for inspections where desired. Once the recently applied product has penetrated, begin leveling the coating, applying minimal pressure to the towel in the process. Wipe down in a similar cross hatch pattern as applied, switching/flipping the towel periodically to use a new face to fully level the coating. Once fully leveled, allow the coating to fully cure for 24 hours, free from water, elements, or weathering. Instructions for Wheels: Prepare your wheels by using the supplied 4oz bottle of Adam’s Surface Prep and edgeless utility towel to clean and degrease the surface of any existing protection or residual films. For heavily contaminated wheels, we recommend a thorough cleaning with Adam’s Wheel Cleaner, or Eco Wheel Cleaner, in addition claying with a Fine Grade Clay Bar and Detail Spray may also be necessary to initially remove stubborn contaminations from the barrels and/or wheel faces. Open the coating bottle and begin by dispensing numerous drops of the liquid onto the supplied Micro Silk applicator to sufficiently wet it. Work the product into the surface, ensuring full coverage over the desired area, using cross hatching motions and overlapping your previous pass by 25-50%. During your time between passes, utilize Adam’s UV Flashlight for inspections. Take note of behind the spokes, in between the crevices of the wheel design, around the valve stem and center cap areas. To ensure a thorough application, the light should shine and reveal an even and consistent bluish hue of light. If you notice streaking in the surfaces, level out with additional product and the used Micro Silk applicator.  Once the recently applied product begins to characteristically flash and sweat into beads, begin wiping the coating off, applying minimal pressure to the towel in the process. Wipe down in a similar cross hatch pattern as applied, switching/flipping the towel periodically to use a new face to fully level the coating. Once fully leveled, allow the coating to fully cure for 24 hours, free from water, elements, or weathering. FAQ: “Can I Apply the Advanced Formula Over My Existing Coating?” Yes you can! For a quick installation, you can wipe the vehicle down with Surface Prep and coat it. For a longer lasting, more durable protection we recommend decontaminating the vehicle with clay and or machine polishing prior to applying the new coating. “Can I layer this product to make it last longer?” Yes, of course, but that doesn’t mean layering this product 10 times will make it 10x longer— any application after 3 rounds will render the product redundant and still provide the same hydrophobic effects.  “What is Ceramic Glow Technology?” Ceramic Glow Technology™ is Adam’s Polishes Patent-Pending chemistry. It’s a crystalline form of an optical brightener that absorbs energy and emits light as it relaxes back down to a lower energy state. “What’s the difference between fluorescence and phosphorescence?” Length of time that the light is emitted. Said another way, the amount of time it takes for the electrons to relax and quit releasing energy in the form of photons or light. “Does the UV Coating act as a durability indicator?” No, it doesn’t. It’s currently offered as an application aid and utility for visualizing the coating. Lack of glow does not indicate lack of coating. “Why does the product glow more intensely on some substrates than others?” Differences in porosity and the ability of the coating to penetrate and bond to different surfaces will cause different levels of film thickness. The thicker the film, the more intense the glow typically. “Will my car glow blue in the sunlight?” No, because this coating is completely invisible and clear under standard light, the coating will only glow a bluish hue under the 395 NM UV light. “Will this coating glow after being “charged” with the UV light?” No, since this coating is fluorescent and not phosphorescent, it will excite and glow only when the light is shone. Contrarily, “glow in the dark” items have a yellow/greenish hue from phosphorescent dyes-- these slowly become excited under any light and will diminish over the course of a few minutes.  “What can I use this on? Can I just use this on the whole car?” Adam’s UV Graphene Ceramic Coating provides protection to an extreme range of areas on your vehicle including Painted surfaces, Trim, Bed Rail Covers, Plastic Engine Bay Components, Headlights, Bed liners, - all are safe to be protected. “What happens if I forget a spot or end up with a high-spot?” If you forget a spot and you catch it in time (10-20 minutes after removal) simply reapply to that area and wipe off after 1-2 minutes. Reactivating the product will allow for easier removal. If left on for longer, we recommend Brilliant Glaze and a microfiber applicator, or machine polishing with Correcting Polish to fully remove the imperfection.  Common Sense Warning: Adam’s Graphene Ceramic Coating™ Advanced is a semi-permanent ceramic coating. Avoid contact with eyes, nose, and ingestion – always keep away from children! If contact does occur, rinse thoroughly with water and monitor for irritation. If irritation persists, contact a physician.

Adam's Polishes discount code

You could save on Adam's Polishes Graphene Ceramic Coating™ Advanced with a Adam's Polishes promo code:

    Adam's Polishes logo

    20% off

    227 uses
    high

    worked about 1 month ago

    20% Off Storewide at Adam's Polishes
View all Adam's Polishes coupons and promo codes

More Adam's Polishes Products

Adam's Portable Spotless Water Deionizers

Adam's Portable Spotless Water Deionizers

Not Eligible For Discounts. Basic Deionizer and Dual Bed Does Not Include Bypass. Please Note this Item will Drop Ship from the Manufacturer 5-7 day shipping. Do you have hard water spots on your vehicle? Adam’s Polishes in collaboration with On The Go, an American Business, has developed a small compact deionizer unit to provide a large supply of laboratory grade deionized water for a spot free water. These powerful units can be attached to your household water supply to effectively filter hard minerals out of your water supply to give you a spot free rinse. Adam's Portable Spotless Water Deionizer comes standard with a built in bypass valve allowing you the option to wash with standard unfiltered water and then quickly switch to deionized water for your final rinse. This feature will ensure that you get the optimum life span from each bottle.  Basic Dimensions: 22" Height x 6.75" Diameter Basic filters up to 560 gallons (@100ppm of TDS) of hard minerals out of water supply (No Bypass Included) Standard Dimensions: 22" Height x 9.5" Diameter Standard filters up to 1,120 gallons (@100ppm of TDS) of hard minerals out of water supply Dual Bed Dimensions: 2 Units @ 22" Height x 9.5" Diameter Dual Bed filters up to 2,520 gallons (@100ppm of TDS) of hard minerals out of water supply  (No Bypass Included) Pro Dimensions: 49" Height x 8.75" Diameter Pro filters up to 2,240 gallons (@100ppm of TDS) of hard minerals out of water supply All Deionizers Include: Preloaded virgin, high-grade, non-regenerated resin TDS Meter  4 Ft. 5/8" Water Supply Hose Unit will produce water @ a TDS of Zero *10lb Resin Refill Is Required For Basic Unit *20lb Resin Refill Is Required For Standard Unit *40lb Resin Refill Is Required For Pro Unit *40lb Resin Refill - Dual Bed Is Required For Dual Bed Unit First Time Hook Up Instructions Step 1: Lube up all four O-rings on the red bypass valve assembly and 90° gray elbows. Step 2: Screw both sides of the red valve assembly tightly on to the black head. Step 3: Connect both of the 90° gray elbows tightly to the red bypass valve assembly. Inlet (female garden hose thread): Downflow Inlet stamped on black head/left side unit facing you Outlet (male garden hose thread): Upflow Inlet stamped on black head/right side unit facing you Step 4: Connect source water to inlet and flush the system out for 2-3 minutes. Step 5: Your unit is ready for use. Refill Kit Instructions:  Step 1: Turn off the water supply and remove the red bypass valve assembly from the black head. Step 2: Remove the black head and empty the used resin into a waste container. Resin is environmentally safe and can be disposed in accordance with federal, state, and local regulations. Distributor tube and basket will be removed during this procedure. The basket on the bottom of the black head can be unclipped to lube the O-ring that is inside the head. Step 3: Rinse out any of the remaining resin from the tank with water. Step 4: Return distributor tube into the tank, slip/place rubber cap into top of tube and then place funnel into top of the tank.  Step 5: Slowly pour or scoop resin into the tank. Shake or tap tank to get all of the resin bedded. Step 6: Remove funnel and rubber cap.  Step 7: Make sure all O-rings are properly seated and lubed (lube provided). Step 8: Make sure the top basket is clipped into the black head. The top basket will slide over the distribution tube and slip into the black head when you push it down and screw it on. Step 9: Screw both sides of the red valve assembly tightly on to the black head. Step 10: Turn on the water supply and flush the system out for 1-2 minutes. During this process you are flushing out the resin dust from the virgin resin. Step 11: Your unit is ready for use.   FAQ's: -How many gallons will the standard unit produce? The capacity of a deionization systems is primarily determined by the Total Dissolved Solids (TDS) in the water source. The TDS can be measured by using the meter provided. The TDS can range from 0 to 1,000 PPM plus but typically will fall between 100-400 ppm across the US. Example: @ 100 ppm of TDS = 1,120 gallons - What value of PPM will leave my vehicle with a spot free rinse? We have provided these ranges over the years: Excellent level: less than 15 ppm *Satisfactory range: Greater than 15 ppm but less than 50 ppm Unsatisfactory level: Greater than 50 ppm *Depends on coloration of vehicle, degree of stainless and one’s individual acceptance level - Does this reduce my water pressure? There is a small pressure drop and should not be noticeable. - When should I replace the resin in the tank? An acceptable TDS ceiling will vary from customer to customer and is greatly dependent upon the coloration of the vehicle. Most customers will operate between 20-40 ppm of TDS, mid-thirties seems to be a fairly wide acceptance level.  We would recommend the use of the rather accurate digital TDS meter and measure the TDS during your first cycle thus quantitatively obtaining your preferred level. - Is it safe to drink? We do not recommend drinking the water. DI water has all the nutritional value removed DI has an operating cost generally higher than drinking water DI tends to have a unique taste and odor - Can I water my plants with Di water? You really don’t need purified water for your plants thus we would not recommend. - Can I run heated water through the Di tank? The DI has a max temperature of 105 degrees Fahrenheit. - Can I hook my pressure washer up to the outlet of this Di unit? Yes, ensure the flow rate of the HPW is within the optimum operating range [0.5-2.5 gpm] of the DI unit and never greater than maximum of 3 gpm for best performance. - Should I use Di water for my entire car wash? You can, but many will use only for the final rinse.   - How does a Deionizer work? “Deionized Water”-Simply said, water flows over porous beads that are positively and negatively charged and the minerals or total dissolved solids are removed. These ion exchange columns are porous beads called exchange resins producing laboratory grade water. - Will this harm my paint on my vehicle? No, DI water used to obtain a spot-free rinse has been used for applications including Auto’s/Class A RV’s/Small airplanes/Motorcycle’s/both residential & business windows plus many car washing businesses use this for their final rinse.   - How long is the Tank good for if not used? The resin has a shelf life of 18 to 24 months. - What do I do with the used resin once I refill the tank? The resin is non-hazardous and can be disposed through normal waste disposal processes. Always dispose in accordance with federal, state and local regulations. - Can I use this with Adam's Soaps? Yes.   - Is DI water safe to go down a drain? Yes.

USD 249.99

Adam's Jack Stand Wall Mount

Adam's Jack Stand Wall Mount

It is time to get your Jack Stands off the floor and onto the wall. Adam's Jack Stand Wall Mount was designed to fit most 2 & 3 ton jack stands. This mount is powder coated in a crinkle black made out of steel and manufactured here in the US. Each Jack Stand Wall Mount holds 2 individual Jack Stands. Fits Most 2 & 3 Ton Jack Stands Holds 2 Jack Stands Individually At A Time Manufactured Here In The United States Powder Coated Black Steel 17.875" Tall x 2" Wide x 3.125" Depth *Mounting Hardware Not Included

USD 34.99

Adam's Yellow Unicorn Shampoo

Adam's Yellow Unicorn Shampoo

Sometimes things just need to be about fun and we wanted to offer something special with Adam's Unicorn Collection of high sudsing, premium foam washes with three vibrant colors and fruit scents! For the best intended experience, the bottles can be consumed by directly attaching to the RTU connections on our Adam’s Premium Foam Cannon and Premium Foam Gun. Ready-to-Use by Directly Attaching to an Adam’s Premium Foam Cannon or Premium Foam Gun Will Not Water Spot, Even in Direct Sunlight Produces Thick Suds with Vibrant Color Added pH Neutral, Safe for All Exterior Surfaces Will Not Remove Existing Protection Strawberry Scented Available While Supplies Last

USD 9.99

Adam's Colored Foam 3 Pack

Adam's Colored Foam 3 Pack

Sometimes things just need to be about fun and we wanted to offer a few more colors of high sudsing, premium foam washes with three vibrant colors and fruit scents! For the best intended experience, the bottles can be consumed by directly attaching to the RTU connections on our Adam’s Premium Foam Cannon and Premium Foam Gun. Ready-to-Use by Directly Attaching to an Adam’s Premium Foam Cannon or Premium Foam Gun Will Not Water Spot, Even in Direct Sunlight Produces Thick Suds with Vibrant Color Added pH Neutral, Safe for All Exterior Surfaces Will Not Remove Existing Protection Green (Watermelon Scent), Orange (Orange Scent), Purple (Grape Scent) Available While Supplies Last

USD 27.99

You May Also Like